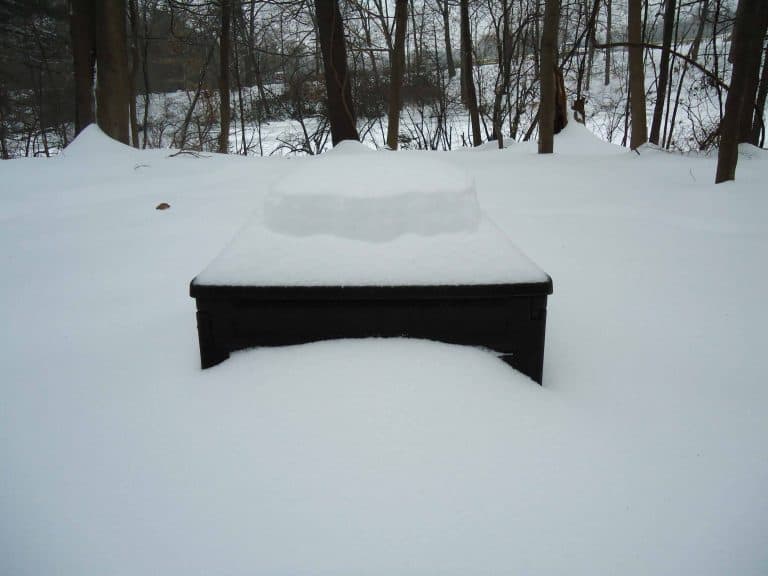
Heat is an essential component of composting. Bacteria work better in warm conditions and will get sluggish if the pile is too cold. Insulating your pile will trap heat in the compost keeping it hotter for longer.
Hot compost gets processed faster and is more likely to reach the temperatures needed to kill weed seeds and pathogens.
So how do you insulate a compost bin? To insulate a compost bin, there are several things you can do, including covering it with an insulating material such as styrofoam or shredded leaves and building a shelter around the bin. If your compost pile is big enough, it could be self-insulating.
How to insulate a compost bin
There are four different ways heat can be lost.
- Surface loss, also known as radiative loss. This is easily understood when you think about standing next to a fire. The heat you feel is the fire radiating heat.
- Convective loss, which is heat loss via liquids and gases moving over the compost. Cold wind would be an example.
- Conductive loss, which is heat loss through direct contact with something cold, i.e., the ground.
- Evaporation, when water turns to vapor.
The best insulators are designed to help minimize all these heat loss methods and keep your compost toasty.
I’ve gone through several strategies below. You can use them by themselves or combine them for a super-insulated compost bin.
Covering the compost
If you don’t have enough material to create a self-insulating pile and don’t want to modify your existing bin, you can opt to cover your existing pile or bin with something.
There’s a wide range of materials you can use to do this, some better than others. To be an effective insulator, the material needs to be able to trap heat and moisture.
Some examples include:
- Tarp
- Straw
- Bubble wrap
- Cardboard
- Leaves
- Styrofoam
The best one for you will depend on your personal needs and the climate you live in. I go through each of these materials later on in the article (click here to skip to the section) and discuss the pros and cons so you can decide which is best for you.
Building a shelter
You can create a shelter around your bin. A shelter will protect it from cold winds and rain and keep the air surrounding your bin warm.
If your bin is moveable, this can be as easy as moving it into a shed or garage. But if your pile or bin can’t be moved, you’ll need to bring the shelter to the compost.
A cheap solution is to build walls with hay bales.
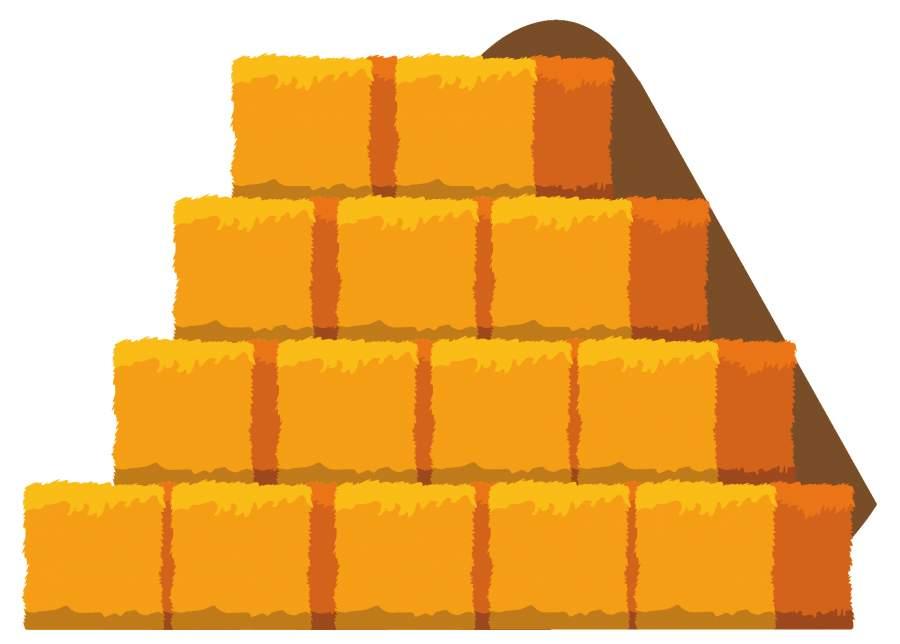
They’re light enough to be portable but heavy enough not to be blown away in the wind.
For a lid, you can use a piece of plywood. I suggest making the plywood big enough to cover the bales’ entirety, so they’re semi-protected from the rain. If the straw gets too wet, it’ll lose its insulating capabilities and rot down much faster, meaning you’ll have to replace the bales more often.
Once they reach the point of no return, you can either use the hay in your compost or spread it as mulch around your garden.
If you want to be really clever, you can use a second piece of plywood to create a door for easy access to your compost.
Burying the compost
Trench composting is often recommended as a good method for winter composting because it occurs underground. The earth is as good a shelter as anything man-made.
While the ground is soft, dig a hole big enough to fit your compost in and bury it. You can either add the compost straight into the soil (this is known as trench composting) or contain the compost in an open bottom bin.
A bin is best if you want to keep the compost concentrated in one place or want to use it in different places around the garden.
Remember to leave a bit of the bin exposed so you can access it throughout winter.
Or you can bury the compost uncontained in an area you plan on using it in. The earthworms already present in the soil will help spread the compost throughout the area creating rich fertilized soil for you to plant in.
To help you remember where you buried the compost and add an extra layer of protection, you can lay a piece of tarp over the compost or a wooden roof.
Raise the compost off the ground
This is most important during the winter when the ground gets cold. The cold ground will steal heat from your compost until it’s the same temperature as your compost.
To stop this from happening, you can raise the compost off the ground. A quick way to do this is to use a compost tumbler. Or, if you have a continuous composter, you can place it on a wooden pallet or a pile of sticks.
You can also lay a piece of tarp underneath the compost but be aware that this will stop worms from entering your compost and also inhibit drainage.
Self insulating
If you have enough composting material, you can create a self-insulating pile. Essentially, when the pile is big enough, the outer layers will insulate the core.
The core will stay nice and hot and is where the bulk of the composting will happen, while the outer layers will be cool.
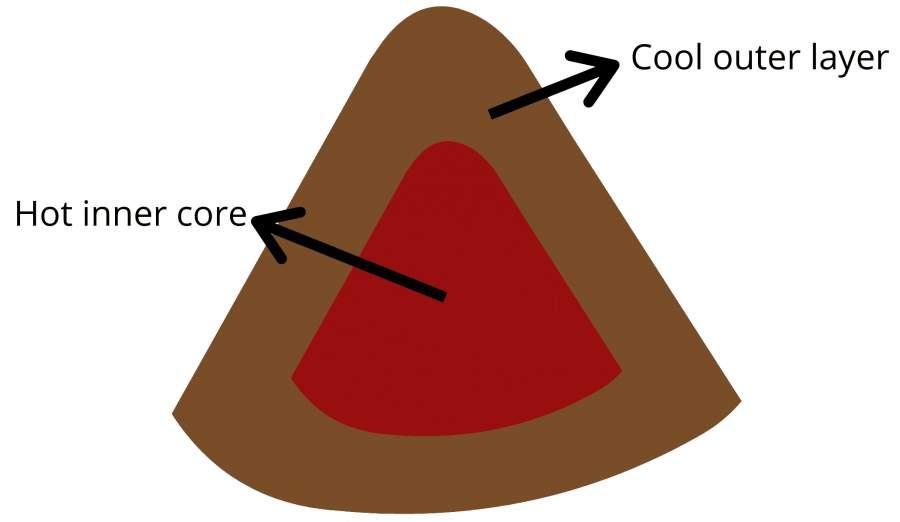
For a pile to become self-insulating, you need at least 1 cubic yard of compost or a pile that’s 3x3x3 feet large. The outer 50-75% of the pile will run cold, while the middle 25% will run hot.
Every once in a while you can turn the pile to move the outer material into the middle where it can start getting processed. However, don’t do this too often because each time you do some heat will be lost.
This method is good if you have a lot of compost and don’t want to source extra insulating materials. But it’s not the most effective strategy, especially if you’re insulting the pile with the intention that it stays hot throughout winter.
Buy / build an insulated bin
If you’re feeling lazy, a quick and effective way of insulating a compost bin is to buy one that’s pre-insulated. There are plenty of options on the market. A good pick is the Jora composter (linked on amazon).
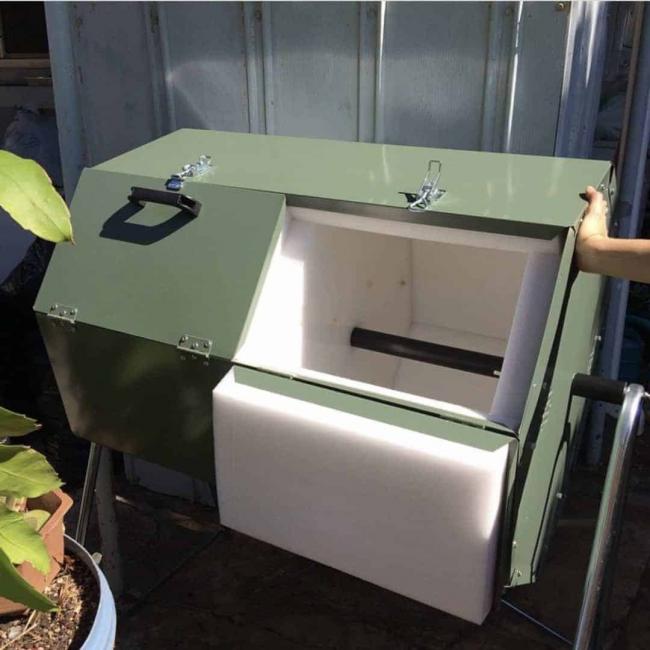
I recommend this bin in my article on the best compost bins for winter. The composter is lined with a couple of inches of polyethylene foam. Plastic is a bad thermal conductor making it a good insulating material, and when it’s turned into foam, it’s even better because it’s filled with trapped air particles.
The insulation combined with the fact it’s a tumbler and, therefore, very easy to turn means you can have finished compost within a few weeks, even during the winter.
If you don’t want to buy a bin, then you can build an insulated bin. The easiest way to do this is with wooden or wooden pallets and some styrofoam or loft insulation. Use the insulating styrofoam to line the wood.
Here’s a video of someone building a similar bin if you need some inspiration.
If you don’t want to use plastic, you can also stuff the bin with leaves or straw or something similar. As natural materials, these will eventually rot down, and therefore, you’ll need to design to the bin so it’s possible to replace the stuffing as and when you need to.
If you already have a bin but like the idea of having insulated walls, then you can use something like cardboard to create an inner wall and fill the space with the stuffing of your choice.
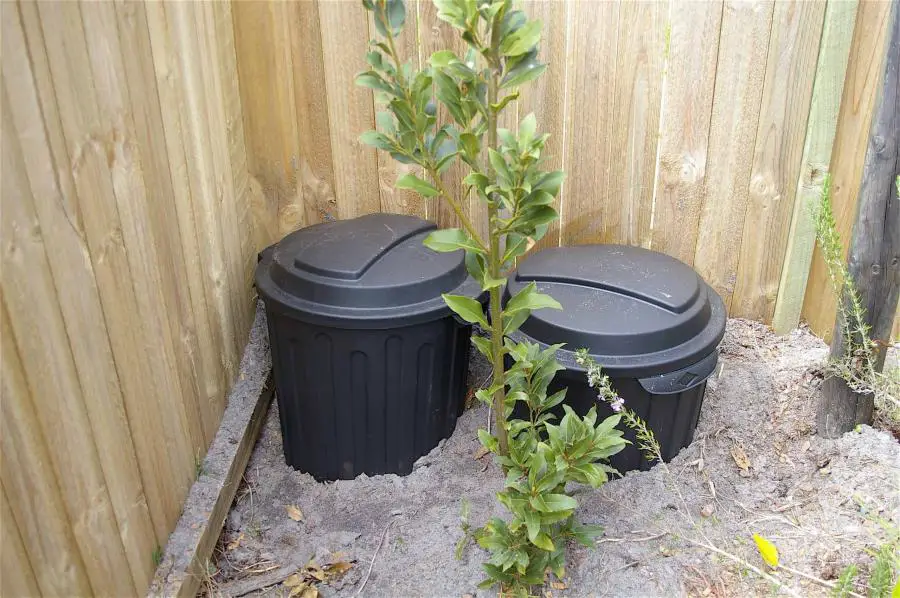
How to insulate a worm bin
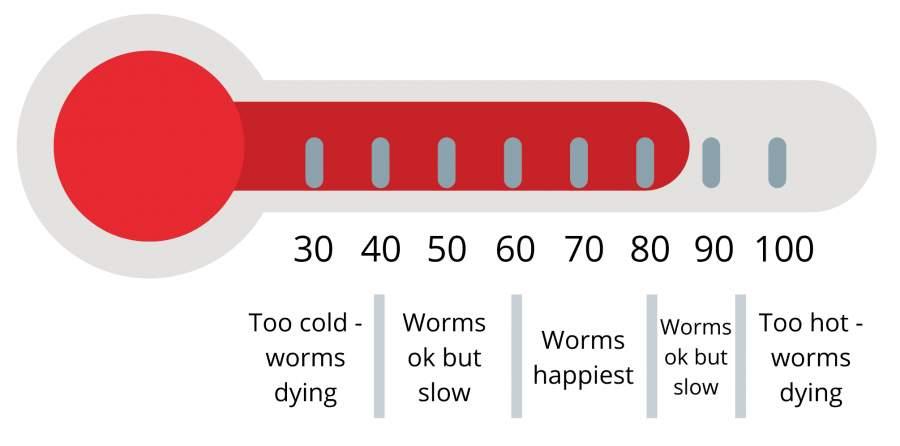
Worms compost most efficiently between 60-80 degrees. Between 40 and 60 degrees, the worms will still work but at a slower pace. If the temperature of the bin drops below 40 degrees, the worms will start dying.
During the winter this can become a problem. To solve it you can insulate your worm bin. This will trap any heat generated and keep the worms working away.
Here are a few ways to insulate a worm bin:
- Move the bin inside. Having four walls and a roof protecting your worm bin will go a long way to making sure the worms don’t get too cold. If you don’t have an inside area where you can put the bin, make sure you place it in a sheltered area of the garden e.g, behind a tree or a fence.
- Bury the worm bin. Just as you can bury your compost bin, you can also bury your worm bin and use the earth as a natural insulator. Leave the top of the bin exposed so you can easily continue to add scraps. This will also ensure the bin stays well aerated.
- Cover the worm bin. Covering the bin with a layer of insulating material like burlap or an old carpet. Coco coir doormats or some soaked newspaper can also work. This will create a barrier and mean less heat can escape out the top of the bin. Also, if your bin came with a lid, make sure you’re using it!
- Attach an insulating material to the side of your bin. You can be creative here, but something like bubble wrap or styrofoam boards will be really effective. If you want to use a compostable material, then try corrugated cardboard. Or build a box around the bin and fill it with something like wood chips and leaves.
You can also use a heating device along with insulation. You can use a lamp, a hot water bottle, or a heating pad to provide warmth to the worms. Be careful not to use too much direct warmth, or the bin could overheat.
If you’re insulating your bin, remember to keep an eye on the temperature to make sure your efforts are being rewarded.
For more information on worm composting check. out my complete guide to vermicomposting, or my roundup of the best worm bins.
The best insulating materials for compost
I mentioned earlier that an effective way to insulate your compost bin is to cover it. A material’s insulating ability is measured in part by its thermal conductivity.
The lower the material’s thermal conductivity the better the material is at preventing conductive loss, or loss of heat through direct contact. You still need to consider how good it’ll be at preventing other types of heat loss such as via cold winds.
Here are some examples of different materials and their thermal conductivities (source, source, source):
| Material | Thermal Conductivity (W/m k) | Notes |
|---|---|---|
| Polyurethane | 0.02 | |
| Foamed insulation | 0.03 | |
| Air | 0.03 | |
| Sytrofoam | 0.033 | |
| Wool felt | 0.04 | |
| Cork | 0.04 | |
| Fibre glass | 0.04 | |
| Wood | 0.04-0.12 | depends on type of wood |
| Corrugated cardboard | 0.047 | |
| Snow | 0.05-0.25 | depends on desnity |
| Paper | 0.05 | |
| Neoprene | 0.05 | |
| Straw | 0.06-0.08 | depends on density |
| Sawdust | 0.08 | |
| Polypropylene | 0.1-0.22 | |
| Plywood | 0.13 | |
| Sand | 0.15-0.25 | depends on moisture levels |
| Soil | 0.33-1.4 | depends on moisture levels |
| Water | 0.6 |
This isn’t an exhaustive list so if you have something else to try, go for it! You’ll quickly be able to tell if it’s working by how hot your compost gets.
The best insulators incorporate trapped air. Trapped air molecules are spread far apart so rarely meet to transfer heat, meaning the heat is trapped for longer.
The thickness of the layer you use will also affect its insulating abilities. A thicker layer will hold heat for longer.
Man-made
The best human-made insulators are made from plastic. Plastics work well because the atoms that make them up are very rigid and don’t move around. The less the particles move around in a solid, the slower heat transfer is, and the better they are at insulating.
The advantages of using a plastic material are:
- They’re waterproof. This is most useful if you live somewhere with a lot of rainfall. Water is good for compost, but too much water can really put a dampener on your composting efforts. You risk drowning the bacteria, and if the water is too cold, it can freeze in your pile.
- A waterproof cover also helps retain moisture within the pile, which can be a good or a bad thing. Good if you live somewhere dry and find your pile needs constant watering. Before you cover the pile, make sure it’s well-watered. Once covered, it should stay that way.
- They’re very effective, meaning you don’t need to have access to a large amount of material.
- They’re reusable, so you can use them year after year without worrying about replacing them.
But there are also some watch-outs when using these man-made materials to insulate your compost:
- They aren’t breathable. This is the main concern people have when using plastics to insulate compost. Oxygen is an essential component in composting, and there’s an argument to say that having a layer of plastic over your compost limits ventilation and starves the pile of oxygen. If you are going to use plastic, make sure you leave some way to aerate the pile.
- They trap moisture. Another issue you might encounter if you have an enclosed bin is that the plastic is trapping too much moisture in your compost, causing it to become a wet sloppy mess. Again, make sure your compost bin has adequate drainage to prevent this from happening.
- They’re not earth-friendly. Obviously, plastic isn’t compostable, and at some point, you’re going to have to throw it away. You can minimize the environmental impact by not buying something new and making sure you source it second hand.
Tarp
Lots of people recommend covering your compost with a simple layer of tarp.
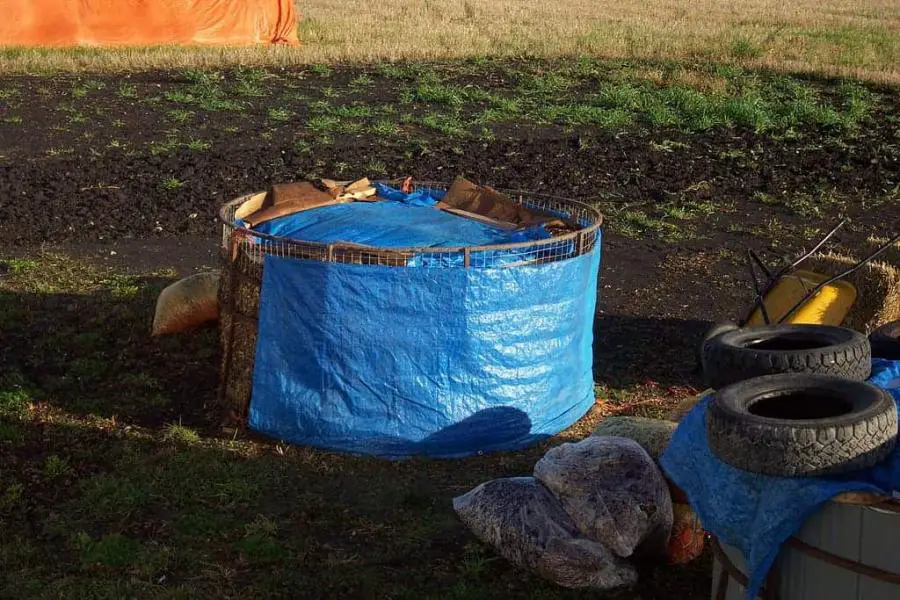
To stop the tarp from smothering your compost, make sure you don’t secure it too tightly. You could also create a flap in the tarp that you can open from time to time to let oxygen in.
Another idea is to prop the tarp up using sticks or poles. This means it’s not laying directly on the compost. Instead, there’s a small gap filled with air, which itself is a good insulator.
Tarp is not a thick material, so it won’t be super effective on its own. You could cover the trap with another insinuating material such as straw or leaves to create a double layer of protection.
Some people prefer to do this when using yard materials as insulation anyway because it means you don’t have to worry about seeds from your insulation infiltrating your compost.
A dark colour trap is best because it will absorb heat from the sun.
Plastic foams (e.g styrofoam, loft insulation)
These are some of the best insulators you can get. Foams are plastics filled with trapped air.
You won’t need a thick layer of foam because it is so good at trapping heat.
One downside is that foams tend to be inflexible. If you have a round bin, it can be hard to surround completely.
Because styrofoam is so effective, it’s a good choice for someone who needs a lot of insulation. For example, I would recommend it if you’re trying to hot compost in the winter.
Bubble Wrap
Bubble wrap is a sheet of plastic filled with air bubbles. The atoms in those air pockets are very spaced out, making it harder for heat to travel. Therefore, bubble wrap is an effective insulator.
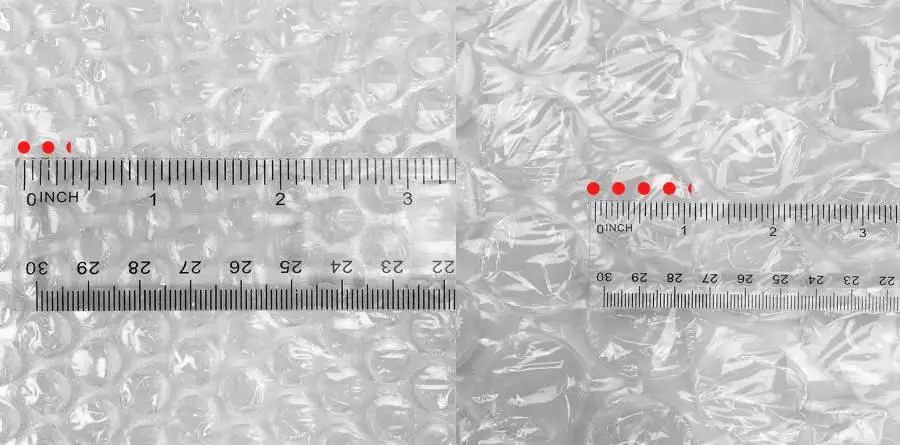
Look for a bubble wrap with big bubbles. The bigger the bubbles, the more space between the atoms and the slower heat transfer will be.
Bubble wrap is flexible meaning it’s easy to wrap around your bin. It’s also cheap so you can use several layers if you want.
Just be careful not to pop too many of the air bubbles as this will reduce its insulating capabilities. Also, over time, bubble wrap will degrade in the sun, so it will eventually have to be replaced.
Natural
Natural insulators are normally yard materials. You can either source them from your own yard or ask around local farms and garden centers to see if they have any going spare.
The benefits of natural insulators are:
- Natural insulators are better for the environment, as they too will eventually rot down. Once they’re no longer useful as insulation, you can add them to the compost pile.
- They’re breathable and won’t prevent oxygen from reaching your compost pile.
The drawbacks:
- They’re not waterproof, and often their effectiveness will be severely affected if they get wet. If you live somewhere rainy, this can quickly become a problem.
- They won’t last forever and will need replacing. This can be annoying if you’re planning to use them all year round.
- You often need quite a lot of material to provide a decent level of protection.
Straw / Leaves
Straw and dry leaves are available in abundance and are easy to get hold of. They work best as insulators when they’re somewhere they can’t get too wet. A soggy pile of leaves isn’t going to do much in the way of insulation.
The more air pockets you can create in the insulation, the better. Breaking up the hay bales will de-compact them making them better insulators. You can also shred any leaves you have. Whole leaves are much more likely to matt together, and with no trapped air, there is less protection against heat transfer.
If you have a lot of dry leaves come autumn and don’t want to make leaf mold, you might as well use them for insulation.
Snow
This might surprise you, but snow is a surprisingly good insulator. Fresh snow is 95% trapped air. Because the air can’t move, the heat transfer is reduced.
So next time you have heavy snowfall, don’t worry so much about your compost bin. It might actually help!
As the snow becomes compacted, it loses a lot of the trapped air and becomes less effective. So it might be worth shoveling the snow off your bin if you notice it getting too dense.
Cardboard
If you’ve ever had a takeaway coffee you might have noticed the little corrugated cardboard sleeve around the cup. It allows you to hold the cup comfortably whilst keeping the contents hot.
The cardboard is working as an insulator. It has a low affinity for heat transfer making it a good material for insulating compost with. The structure of the cardboard traps air with it which, as you’ll have read above, makes for a good insulator.
Cardboard is easy to get hold of and relatively easy to work with, it’s a good option if you need something to quickly line your bin with.
How to measure the temperature of your compost pile
If you’re insulating your pile, chances are you’re interested in the temperature of your compost.
One visual sign of hot compost is steam. If you can see steam coming out of your pile, you can be sure that the compost is heating up nicely.
You can also feel the compost. Hot compost will feel warm to the touch. Be careful when sticking your hand in the pile though, if you have really hot compost, it could burn you. The middle of the pile can often be much hotter than the outside.
Lastly, you can use a compost thermometer (link to amazon).
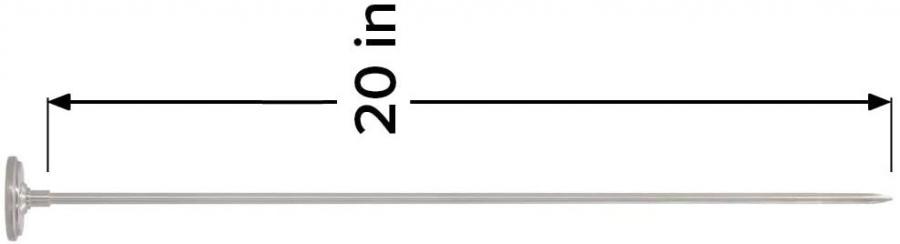
These are small devices with really long stems so they can reach the middle of your pile. If you’re hot composting, they’re very handy. You can measure exactly how long your pile is in the ‘hot zone’.
Do I need to insulate my compost bin?
You don’t need to insulate your compost bin to create compost. Cold composting is just as viable as hot composting. It will just take longer. Nature is incredibly resilient, and even a pile that’s been frozen solid all winter will revive itself in the spring without much help.
However, if you want to speed up the composting process, then insulting is helpful. Composting bacteria work best between 90 degrees and 160 degrees. If your compost pile drops below 60 degrees, the bacteria will become sluggish, and the activity in your pile will slow down.
And there are also a few specific situations where insulting is essential. These include hot composting in a temperate environment, composting during a cold winter, or when you’re composting with a small amount of material.
Hot composting
Hot composting is a popular method of composting that requires the compost to reach temperatures above 120 degrees Fahrenheit.
At these temperatures weed seeds and pathogens are killed off so you can safely compost weeds and diseased plants without worrying about contaminating the compost. You can even compost human waste.
Hot compost also produces finished compost much faster than cold composting. Using the Berkeley method, you can have compost in as little as 18 days.
If your compost is struggling to reach and maintain these temperatures, then insulting the bin can be a massive help. If you live in a temperate or cold climate, insulting is a must for hot composting.
Winter composting
During the winter, as the temperatures drops, most composting activity comes to a halt. If you want to carry on composting throughout the winter, insulting your pile is one way to go.
This will ensure the outside temperatures don’t affect the compost too much, and the activity levels stay constant. Winter composting is great because it means come spring, you have lots of finished compost to use around the garden.
Small amounts of compost
If you only have a small amount of waste to compost, it can be tricky to get the process started because as soon as any heat is created, it’s lost.
Insulating the pile solves these problems and lets you create nutritious compost no matter how much starting material you have.
Other tips for heating up compost
Other ways you can give your compost a helping hand to heat up include:
- Shredding all the material you put in. This will mean the bacteria have more surface area to work on and therefore there’ll be more microbial activity which in turn generates heat.
- Place your compost bin in the sunniest part of your yard to maximize the impact of heat from the sun.
- Add a bulking material to your pile such as wood chips. The aim of this is to create air pockets within the compost to aid insulation. If you don’t have wood chips, you can easily make some with a chipper shredder.